
Painting core infantry is a skill that should be mastered as soon as possible. It's best to pick a color scheme that can be finished quickly and easily. With this scheme, each color builds over the last. With practice, the models can be finished in record time.
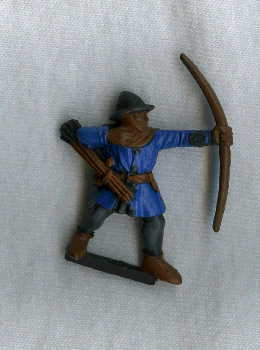
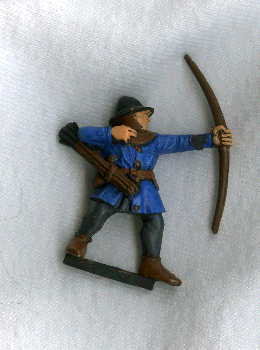
These models were intended for a warband for Warhammer Skirmish.I painted these in a color scheme to represent a Empire Middenheim warband.
The warband is themed around the frozen province of Middenheim, and so were given a blue color scheme with snowy bases. Warhammer Skirmish is kewl for trying out new color scheme or painting models you might not otherwise get.
In this case, I wanted some blue Empre models on snow bases, but without the tremendous cost of buying a whole new army. Even better, Bretonnian archers can be found for super cheap, far cheaper than the $3.00 a model (2004 price) that Games Workshop wants for metal Empire Archers. The basic idea behind painting Bretonnian archers, is, of course, the same.
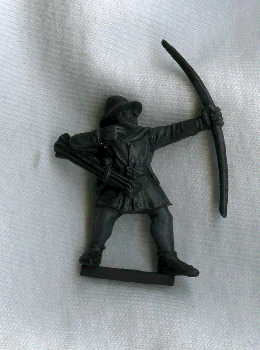 |
Step 1 To start with, the entire model was sprayed with Chaos Black primer. The model was next drubrushed with Chaos Black mixed with a small amount of Codex Grey. This mixed was them liberally drybrushed over the entire model. Additional amounts of Codex Grey were added to the paint mix, and then drybrushed only over the raised areas of cloth to give further definition. More of the mix was added to the legs to set them apart from the heavy cloak.
|
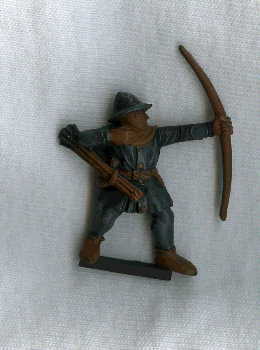 |
Step 2 Bestial Brown is applied to the bow, skin, quarrel of arrows, and leather areas of the model.
|
 |
Step 3 Vermin Brown is applied to the leather areas of the model, leaving a small amount of Bestial Brown in the recesses for shading.
|
 |
Step 4 Ultramarines Blue is applied to the main areas of the tunic. At this point, you should just go slow and make sure all the basic areas of the model are covered.
|
 |
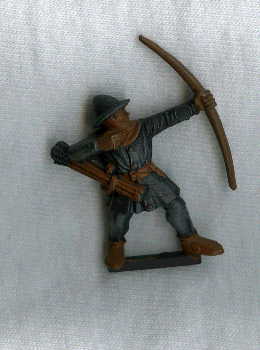
Step 5 Skull White was mixed in with the Ultramarines Blue to create a lighter shade of blue. This mix was then drybrushed over the folds of the tunic. Additional amounts of Skull White were added to the paint mix, and then drybrushed only over the raised areas of cloth to give further definition.
|
 |
Step 6 Bronzed Flesh is applied to the face and hands. If you lightly drybrush over the skin at first you can leave Bestial Brown in the recesses. This gives an easy additional layer of definition for the fingers, eyes and mouth. Then, go over the model with Bronzed Flesh to make sure everything is covered.
|
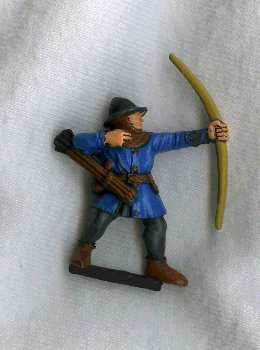 |
Step 7 Bubonic Brown is applied to the bow. You'll likely need to apply several thin coats application of Bubonic Brown to get an even finish. You can also highlight this with Bleached Bone if you wish.
|
 |
Step 1 Boltgun Metal is applied to the metal areas of the model.
|
 |
Step 1 Shadow Grey is added to the feathers on the quarrel of arrows. The edges of the model's base will later be painted Shadow Grey, so this is a good match for color.
|
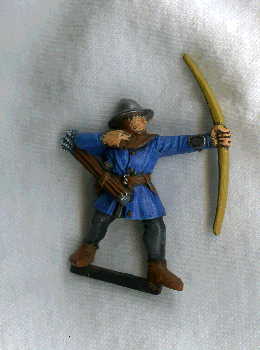 |
Step 10 Finally, Skull White was painted over the feathers on the quarrel accentuate the detail.
|
And that's it! Your archers are now ready to take to the field! Whether using them as Bretonnian archers for Warhammer Fantasy Battle or Middenheim archers for Warhammer Skirmish like me, just be sure to pick a color scheme you can live with and finish in a decent amount of time. There's no reason to spend hours painting every pupil on rank-and-file models, especially when you know they're going to get blasted by a cannon first turn...
[x]
Burly archers patrol the cold and frozen lands of the northern realms.
For more Bretonnian painting advice you may want to check out Painting Bretonnian Archers Version 1 and Version 3. These will show you more Bretonnian archers painted in different color schemes.
Good luck and may you roll many 6's!

